An Effective (and Protective) Outdoor, In-Ground Vermicomposting Method
Many people become interested in vermicomposting as a way to turn their compostable wastes into a rich “black gold” that will boost the growth and health of their plants. The most common approach is to set up some form of small-to-medium sized “worm bin”, add kitchen scraps and bedding, and then - usually at least 4-6 months later - harvest some vermicast they can put to good use.
A fundamentally different vermicomposting approach - one we are very interested in here at Pacific Composting - involves setting up systems in the ground, where they can much more directly benefit soil and plant health (this is known as “in situ vermicomposting”).
We've written previously about DIY in-ground bucket systems, and the Urbalive (Plastia) in-ground worm composter. Both are very easy, small-scale options we often recommend for anyone wanting to test the waters with in-ground vermicomposting. The main limitation (especially the Urbalive), though, is their small size. You either need to be content with limited waste processing, or you need to set up multiple units in order to enjoy the full benefits.
If you are looking for something super simple, that doesn't even require a bin at all, and offers much more processing power, look no further than the vermicomposting trench!
As the name implies, vermicomposting trenches are basically just extended holes in the ground, set up in a way that supports the health and success of composting worms!
PROS
-
Protection - In-ground systems like trenches provide incredible protection against hot, cold and dry conditions.
-
Simplicity - You really just need to excavate a hole and set up the system. No need for bins (although setting bins down in trenches, or lining them in various ways can provide an extra layer of protection).
-
Low Cost - No need to purchase one or more expensive bins. All you need are your worms and system supplies. The best way to stock trenches is with worm-rich material from active worm composting systems. If that’s not an option, even a small quantity of composting worms (e.g. ¼ - ½ lb) can be enough to get the system going.
-
Processing Potential - You’ll likely be surprised by just how much material a mid-sized trench can hold, but the really amazing part is just how much material you can actually process over time. Especially once the worm population gets well established and the system finds a certain level of balance.
-
Direct Fertilization - One of the best ways to use vermicomposting trenches is next to growing plants. This way you don’t even really need to harvest the vermicast; the plants can draw resources from the trench directly.
-
Flexibility - Unlike a worm bin, where you are limited to the particular design/size of the one(s) you are using, with a trench you get to decide the size and, to a certain extent, the shape of the system. So, it can be easier to make them work in your outdoor space.
-
Easy to Hide - Related to appearance, if you like the idea of keeping composting systems fairly well hidden in your yard, vermi-trenches are a fantastic option since the only visible zone is the cover bedding. You can hide them even more by putting other covers, or even something like a removable walkway, over top of them.
-
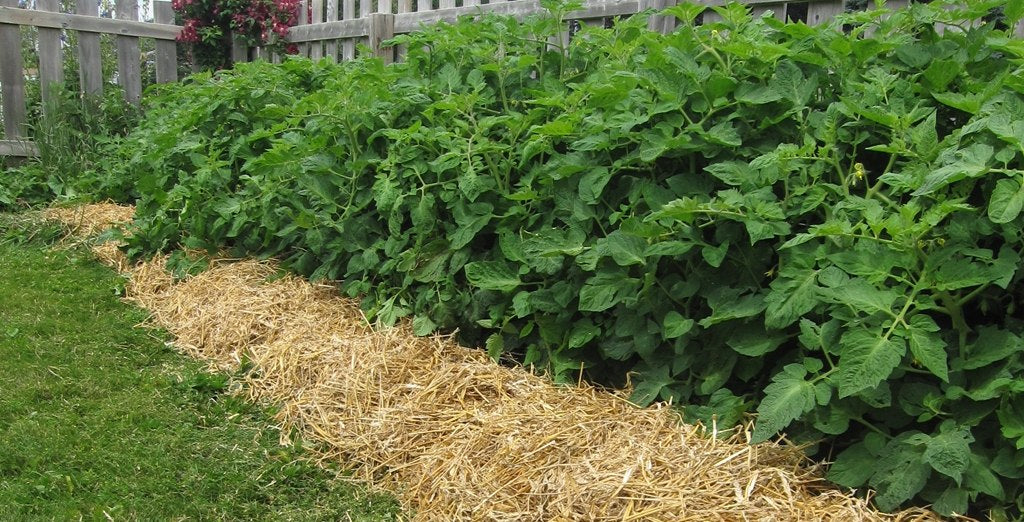
Forgiving - Once a trench gets rolling along nicely, you will be amazed by the amounts and types of materials you can “get away with” adding. E.g. We would never suggest adding heaps of grass clippings to a regular worm bin, yet this is a material you can easily heap up on top of a vermi-trench, without any concerns at all!

(Yep, there was a trench running through the middle of that raised bed, and the plants seemed pretty happy about it!)
As great as vermicomposting trenches are, it’s important to touch on some of the limitations of this approach as well.
CONS
-
Less Protective in Some Ways - A typical vermi-trench, simply dug into the ground, is a very open system, providing a wide range of organisms easier access than is the case with an enclosed bin (for example). NOTE: There are various ways you can improve the protection your trench provides (e.g. lining it with protective materials, actually setting bins down into it etc).
-
Labour-Intensive Set-Up - To build a mid- to large-scale vermicomposting trench you will either need some specialized machinery (e.g. mini backhoe), or will need to commit to some solid manual labour.
-
Need Soil Access (Usually) - The entire idea of creating a trench is that you are digging a hole in the ground. So, you will obviously need access to some form of “ground” that you can dig into. 😆 That said, we will chat about various hybrid options in Part II of our vermicomposting trench series.
-
Soil Hazards - Even if you do have soil access, that doesn’t necessarily mean you will have easy digging! Rocky soils, and soils heavily invaded by roots are two common examples of situations where trench-building can be more challenging.
-
Location Hazards - Even if the soil is easy to dig in, there can be other location-specific hazards that will make vermi-trenches less ideal. If you live in a low-lying zone with a high water table, you may just end up with a hole that fills with water. Similarly, if you are in an area that receives torrential rains, regular floods etc, in-ground systems won’t likely be as great an option. Extremely hot/arid regions may also not be ideally suited for setting up trench systems.
-
Can’t Be Moved - Once your trench is in place, you can’t simply lift it up and move it elsewhere. This isn’t necessarily a deal-breaker, just something to keep in mind for proper planning and preparation.

Building Your Vermicomposting Trench
LOCATION
There are important considerations when choosing the best site for your vermicomposting trench.
-
Fairly level ground, where soil is easy to dig - we want to make our trench-building job as easy as possible. Trying to build one up the side of a hill in rocky terrain obviously isn’t going to be an ideal scenario! 😉
-
Partial shade can be helpful - especially in hotter locations - but be careful not to put vermi-trenches too close to trees or shrubs since they can be major moisture thieves, and their roots can also make it very difficult to dig. Shade can also be less ideal if we want our trench to be…
- Near garden plants - this is totally optional, but one of the perks of this method is that it can be a great way to naturally fertilize your plants. If you do intend to do this, it is best to plan ahead. Trenches can be added at any point in the growing season, but for best results, you should have them in place before your plants are well established. This way you reduce the risk of damaging roots.
We chose two small raised beds as sites for our own vermicomposting trench demonstration systems. As you can see below, the beds were badly overgrown with weeds. So, step 1 was clearing all that out. This added some additional labour for sure, but the bonus was that we ended up with a lot more material we could use in the systems.
BEFORE

AFTER

NOTE: We would typically recommend using beds that are wider than these ones (which are less than 4 ft wide), so as not to crowd out your garden space with the trench, but these beds weren’t being used for anything, so we felt it was a good spot to showcase the concept. There is still room for growing a row of plants on each side of both trenches.
TOOLS
Assuming you don't have any sort of excavator, you will likely need to dig your vermicomposting trenches by hand (or will need to get someone else to do it for you).
Make sure you know your limitations and don't overexert yourself, especially during hot weather.
The 3 main categories of tools we recommend are:
-
Soil Choppers - Heavy duty pick axes and hoes can be worth their weight in gold when it comes to trench digging. This definitely proved to be the case for us!

-
Soil Looseners - Garden forks and similarly tined tools can really help to break up the soil into smaller clumps (with less chance of harming soil worms), helping to prepare it for the next category of tools…

-
Shovels - it won't come as any surprise that shovels are highly recommended for this type of work. Different types can serve different purposes. A long handled construction shovel is a great all-purpose tool for excavating the soil once it is loosened up. A heavy square edged shovel is perfect for creating nice straight walls (unfortunately, we didn’t have one of these). It might sound strange, but plastic scoop shovels - even a snow shovel - can be fantastic for helping you dig out a lot more loose soil at once (likely not as ideal when working with heavier clay soils). They are also great for scooping in loose materials during the set-up process!

DIMENSIONS
Depth
You want your trench to be deep enough to offer good protection, but not so deep that it ends up totally anaerobic in the lower reaches (or requires an excessive amount of labour). We feel the sweet spot is somewhere in the 1-3 ft range. Some factors that can influence your decision include:
Your Local Climate - Trenches in regions with really hot and/or cold (dry etc) conditions can likely benefit from some additional depth. On the flip side, if you live in a very mild climate (with moderate to high humidity) you may not need to go deeper than a foot.
Soil Conditions - If the digging is really challenging due to rocks, roots etc, you may have to settle for whatever depth you can get to. We'll look at a strategy for creating an "above-ground trench" in Part II of our vermicomposting trench series.
Size of Waste Stream - If you have a lot of waste materials (especially when first setting up your trench), it will make sense to go deeper than 1 ft. Just keep in mind that the levels of material in the trench will continue to go down, so a steady supply of wastes will also be even more important with a deeper trench.
—
For one of our demo trenches (referred to as “trench #1” in this article), we went all out in terms of depth; we will provide the rationale behind that a bit further along. Unfortunately, images aren’t great for doing depth justice but, believe us, this trench was definitely between 2 and 3 feet deep! 😄

Width
The width of a vermi-trench is also a very important consideration. You will want a system that doesn’t take up too much room (especially when positioned close to growing plants), but can also be easily accessed - another important factor to think about if you are growing plants next to it. That said, you also don’t want it to be so narrow that it is difficult to deposit wastes into. We suggest somewhere in the range of 12 to 18”.
Length
How long should you make your vermicomposting trench?
Well, how long is a piece of string? 😉
Length is the one dimension that is completely up to you, and it should be dictated by your particular situation, goals and needs. A trench can be as short as a “pit”, and as long as your property and layout allows.
In our case, we were obviously limited by the borders of our raised beds, but we did at least extend them from one end to the other (not mandatory)
—
Make sure you have a plan for all the dirt you excavate during the trench digging process. You’ll likely be surprised by just how much you end up with. Below you can see what our heap looked like from our first trench, part way through the excavation stage.

PRO TIP - We recommend tossing your dirt further away from the trench initially, and gradually heaping it closer and closer in, the deeper you get in the trench. This way you are moving it furthest when you are at your best (not super tired), and there is a lot less chance of having dirt pouring back into the hole.
Some Other Tips Relating to Digging
- Start really narrow and expand your trench gradually from there. You can always shave more soil from the sides, but you can’t put it back in place once removed.
- Be careful with soft upper soil layers, both in terms of digging and stepping. Unless you happen to have very firm soil right at the surface, it is easy to end up with cave-ins if you step too close to the edge or are too vigorous with your digging.
- Rocks can definitely add an extra layer of difficulty to trench digging. If you do have rocky soil, we recommend taking your time with the digging process. Picks and metal pry bars can be very helpful for loosening and removing larger stones. Just be careful not to create a cave-in (especially up near the surface). Sometimes it’s better just to leave a rock in place for the sake of maintaining trench integrity.
ADDING YOUR STARTING MATERIALS
Vermi-trenches use the same basic, 3-part model that we recommend for most vermicomposting systems: 1) False Bottom, 2) Worm Zone, 3) Cover Bedding. As you might guess, layering is also a very important part of the process (especially when first setting up the system). We also recommend aiming for alternating layers of “greens” and “browns” - although there is certainly some flexibility here.
Beyond these basic fundamentals, as far as what materials you use, and in what order you add them goes, the sky is the limit!
We strongly encourage you to take advantage of the waste streams you already have easy access to.
Circling back to why went deeper with our first demo trench…
We know a lot of people have woody wastes, and that they are often quite challenging to deal with in a more typical composting system (unless chipped up). A great way to put these types of wastes to good use is in the bottom of a somewhat deeper trench (since they do tend to take up a fair bit of space).
In a sense, this is like a very simplified form of Hugelkultur.

The quantity of these types of materials you add is up to you, but we recommend that they be limited to the lower ⅛ of the trench. Further up, they can make it more challenging to effectively work with the system, and they do take a long time to fully break down.
The next component in our trench (#1) false bottom was alder wood chips. They worked very nicely with the branches, since they settled down into the empty spaces, and didn’t really take all that much additional room in the system. Both the chips and the branches are excellent for drainage, helping to keep the worm zone more aerobic.

Another great false bottom material is corrugated cardboard (plain brown, not glossy coloured), especially if added over top of woody wastes. This was the approach we took with trench #2 (we’ll cover that set-up in greater detail in another blog post).
The next material we added to trench #1 was some old hay. This is a lightweight, bulky material that should help with airflow. It has more “green” value than similar bedding like straw, yet should still be mellow enough not to cause any issues for the worms.

We then added some grass/weeds with extensive root mats that we had been pulling off of landscape fabric (used to be the floor of a greenhouse). This is a somewhat similar material to sod - and you can add some actual sod in the lower reaches of a trench. Just keep in mind that you will want to limit the amount of actual soil that ends up in your trench. Also note that adding grassy wastes with roots too close to the surface can result in grass growing out of the system (not what we want).
Like the hay, these grass mats could be considered a fairly mellow “green”. Actual grass clippings would have been less ideal down in the lower half of the trench. We will come back to this in a minute.

Since no worms had been added yet, this was a good opportunity to help with the material settling process, giving us a bit more room for more materials. We simply jumped in and walked back and forth (it’s actually quite fun)!

When/Where to Add Composting Worms
There are two potential stages/locations we recommend adding worms. Either early on, fairly close to the bottom of the system, or up at the very top once you have finished the trench. The rationale here is that we really want to keep them safe. A system with this sort of (big) volume of starting materials will have the potential to heat up quite a bit early on. The lower reaches of the trench will always be cooler than further up (assuming ambient conditions are fairly warm - the opposite is true during cold seasons), and there tends to be more safe materials down there (thanks to the carbon-rich false bottom).
Circling back to our mention of rich materials like grass clippings not being as ideal down towards the bottom - this is because of their potential for generating heat and/or releasing ammonia gas (deadly for worms).
If you are going to add worms up near the top of the system, we recommend either waiting at least a week or two (or whenever internal temps are down below 30 C), or adding a lot of worm-rich material from another system just under the cover bedding. In the latter case, the extra habitat material gives them a safe zone to hang out in until temps further down drop to a safe range.
NOTE: If you don’t have access to worm-rich material (i.e. you don’t have any other vermicomposting systems going already) and are adding bulk worms from a supplier, we strongly recommend adding them down near the bottom of the system or - even better - just letting the trench sit for at least a week or two before adding them (again, be sure to use internal temperature as your main indicator of worm-stocking “readiness”, not elapsed time).
We opted for a lower-reaches stocking approach with trench #1.
Over top of our grass/weed mats we added a layer of well-aged, bedded horse manure. This is yet another mellow green/brown, and something that serves as a great habitat base for the worms.

It’s a great idea to do some watering at this point, especially if some of your early materials are quite dry and you are planning to add worms down in this zone. Just generally, it also helps to ensure a more uniform moisture level throughout the trench. Some watering both underneath and just over top of the worm-stocking zone is a good idea.
The Red Wiggler worms we used for our trenches came in the form of worm-rich, aged pig manure. It may not look like much (see pic below), but the material was absolutely crawling with worms. Adding them this way offers the added advantage of giving them some extra food and habitat that they are very familiar with.

If we had been adding this up at the top of the system, we likely would have kept it all together off to one side of the trench, so the worms would have more of a consolidated safe zone to hang out in. In our case, we wanted to spread out the worm-rich material all along the length of the trench, so as to help encourage a more even distribution of the worms in the system.

We happened to have plenty of the nice, aged horse manure mix, so we decided to add another layer over top of the worm-stocking zone, before watering once again.

Next, we added a layer of straw. This has even more of a loose structure than hay, and it’s also even more of a “safe material” (higher C:N ratio). So, in a sense, it will serve as a cover over the early “worm zone” of the system (this zone will of course expand over time) and separator from the upper reaches of the system.

At this stage we were still low enough in the trench to feel comfortable with adding more of the rooted grass/weed mats (a material we had a lot of). Again, you do want to be a bit careful about adding this type of waste up near the top, since it has the potential to actually start growing and taking over your trench.

Next, it was more bedded horse manure…

Then, another layer of hay…

More horse manure…

Some more watering…

A layer of old “triple alder mix” (alder sawdust, chips and bark mulch that has been sitting outside for at least a year or two)...

And one last layer of horse manure!

Note how we mounded up that last layer (of main-system material). You can expect to see a fair bit of settling in a trench, even before materials really start breaking down. Our early stomping session, combined with over-filling should help to keep the overall level fairly high for an extended period.
The official “last layer” - the third part of our 3-part set-up model - was the cover layer. In our case, this was a really thick layer of hay. Typically, you would stick with strictly bedding materials for this zone, but with a trench you could even use something as rich as grass clippings or weeds (if you happen to have enough of them on hand). Just make sure you use materials that will cover the worm zone effectively (and evenly), but that won’t blow away when dry. E.g. shredded cardboard or fall leaves often aren’t the best choice, unless you have some other type of cover over top, such as a tarp.

Speaking of tarps, the only time we would recommend tarping a trench is during colder/wetter times of year, when you want an added layer of protection. During warmer weather, covering the system like this will impede airflow, and potentially lead to overheating.
Ongoing Trench Maintenance
THE FIRST FEW WEEKS
After your initial system set-up, you may notice that the overall level of material in the trench seems to drop fairly quickly. As touched on earlier, settling is to be expected early on. Again, compressing materials (via walking etc) before worms are added, and over-filling the system during the initial set-up can both help to ensure you don’t see too much of a drop.
Feeding Your Trench
There are two main ways to add waste materials to a vermicomposting trench:
-
Food pockets - With richer materials, especially water-rich kitchen wastes, it is a good idea to actually dig out a depression in the upper trench material, drop in the wastes, and then cover them up really well. This helps to ensure that they won’t attract troublesome animals like raccoons. NOTE: if you are in an area where local wildlife activity is a major concern, you may want to stick with more typical yard wastes, manures etc, and avoid food wastes altogether.

-
Basic Layering - The easiest (and perhaps most common) way to add more materials to your trench is to simply layer them on top of, or just below the current cover layer. How often you add new materials is totally up to you. Again, once the worms have their established “safe zone”, there is very little risk of causing issues by adding new materials (even a lot of them) up top. Just make sure you always have an uppermost layer that works well as a cover.
Trench Take-Aways
- Aim for a deeper trench (ideally 2+ feet deep) if you plan to add branches or other bulky woody materials. In general, woody wastes in the bottom of a trench can help with drainage (and thus aeration).
- The exact materials you add are far less important than how they are added. Use what you have readily available, and make sure you have enough for the size of trench you are building.
- Add more high-C:N materials further down in the trench to help make this a “safe zone” for your worms. As you move further up you can start to alternate layers of “greens” and “browns”.
- Walking on layers (as long as the worms haven’t been added yet) and overfilling your trench can help to ensure you won’t see as much settling of materials early on.
- The safety of your composting worms needs to be a major priority when it comes to stocking. Your main options are: 1) set-up day, down in the lower reaches of the trench, 2) set-up day up at the very top of the trench (only if adding with lots of safe habitat material), or 3) later on (likely 1-3 weeks) up near the top once temps in the system have dropped below 30 C.
- Trenches should always have a thick layer of cover material. It doesn’t really matter whether it is “green” or “brown, as long as it creates an even cover layer, without the risk of blowing away.
- There is no rush to “feed” a new trench (since it will usually have been set up with plenty of rich waste materials), but if you do have a steady stream of new wastes there’s no harm in adding them up at the top.
- Kitchen wastes are best added in excavated depressions, and then covered with a thick layer of other material. Grass clippings, weeds and various other yard wastes (apart from woody wastes) can usually just be added in the form of a new cover layer.
Stay tuned for Part II in our trench series, where we will look at a somewhat simpler set-up approach, and explore some “hybrid trench” ideas. We will also look at the later stages of a vermicomposting trench, and address some of the common questions people have about these types of systems.
Helpful Related Resources
DIY In-Ground Worm Composter
DIY In-Ground Worm Composter - Summer Update
The Plastia In-Ground Worm Composter
Can I Add Red Wigglers to My Garden?
Outdoor Vermicomposting 101
Living Materials
Bedding - The Most Important Material in Your Worm Bin?
Recommended Products
Red Wigglers
Worm Starter Kit
Worm Rake
pH Buffer Grit
BioChar
EM