Download the Easy DIY Worm Bin instructions!
Getting started with vermicomposting doesn’t need to be overly complicated or expensive. One great way to save money is to create your own Do-It-Yourself (DIY) worm bin. There are a wide range of options here, including repurposing existing vessels - like old sinks, bathtubs, and feeding troughs - or building something from scratch, with plastic tubs, wood or other materials.
In this article, we’ll be looking at simple DIY systems you can set up using plastic storage tubs.
Plastic tubs have the advantage of being widely available, fairly inexpensive, lightweight, durable, and great for moisture-retention. On the flip-side, it’s important to also realize that with great moisture-retention comes the potential for these types of systems to get too wet, and also to suffer from a lack of proper air flow at times. So, it’s going to be important to always keep this in the back of our minds while we design, set up, and maintain these systems.
- A super-basic, single bin approach, and
- A more-advanced “continuous-flow”, double bin design.
Best Tubs for the Job
The first step is making sure you choose the right container(s), both for your own situation and goals, but also for the worms and their helpers! For starters, we highly recommend you avoid any type of transparent bin. Worms are highly sensitive to light - so, as much as possible, we want to limit their exposure to it.
Choosing an opaque (not “see-through”) bin is a step in the right direction. Also note that clear plastic bins tend to use a type of plastic that is more fragile - so, you may even find that these bins are more likely to crack, and just generally, won’t last as long.
One model commonly used for vermicomposting is the Rubbermaid Roughneck Tote (what we will be using for our double-bin system). Another great option - especially if you want to stack multiple systems on top of each other - is the Home Depot “HDX” series. It has a more rigid design, and even has sunken channels in the lids where you can drill your air holes, thus avoiding having them covered over if you have a bin stacked on top.


How Big Should The Bin Be?
The size of container you use is up to you, but do keep in mind that really small bins won’t offer nearly the same vermicomposting potential (and may leave your worms feeling cramped). Really large bins, on the other hand, can be much more difficult to move around, they can be more prone to developing anaerobic pockets (slowing the process, and potentially creating issues for your worms), and they can also overheat, especially early on.
 We recommend a bin size in the 40-70 litre (10.6 - 18.5 gal) range. Aiming for something that’s a similar size (and with similar proportions) as a typical recycling “blue box” is a great way to go.
Apart from the overall volume, another important consideration is the surface area vs depth. It is usually best to keep your bin depth to 18” or less, with a surface area of at least 1.5 sq ft. A bucket is a prime example of a container (a lot of people wonder about) that’s not ideally suited for vermicomposting, as-is. For perspective, a typical bucket surface area is more like 0.8 sq ft.
NOTE: There are definitely ways to modify buckets for effective vermicomposting (e.g. DIY In-Ground Worm Composters), but for the average starter bin, we recommend choosing something with more surface area. This will better support aeration, and help to avoid excess pooling of liquids in the bottom.
On the flip side, really shallow tubs and trays - while often great for air flow - tend not to be nearly as good for moisture-retention, so it’s usually best to choose a container with a depth of at least 6 inches.
Lid or No Lid?
Some may wonder if they really need a lid on their plastic tub worm bin. There are definitely pros and cons to both approaches. Using the lid provides an extra layer of protection for your system, helping it to retain more moisture, reducing the amount of light shining in, and potentially helping to reduce pest issues - but in some cases, you can end up with swampy, anaerobic systems over time (especially when fruit and veggie wastes are being added regularly).
The lidless approach, on the other hand, can greatly improve air flow, which in turn can improve the overall efficiency of the system - but it will likely require more attention (periodic misting etc), and may leave you more exposed to pest invasion.
Generally, we recommend using a lid - with plenty of air holes - especially for those who will be leaving their system alone for longer stretches of time.
If you do decide to go lidless, just keep in mind that it will be even more important to add and maintain a very thick layer of cover bedding. This, in a sense, will serve as a breathable lid.
Drainage
Free draining systems offer the advantage of having less potential for the development of anaerobic zones - but it’s important to note that (with typical indoor worm bins) this drainage can also be messy to deal with. Our “basic” system will be a no-drainage system, while our double bin system is a free draining design.
On that note, it’s time to dig in and explore these two tub system options!
Basic Single-Bin System

This approach offers a very fast and easy way to get started with vermicomposting. It is especially well-suited for those with a limited budget, or who simply want to test the waters.
It’s important to note, though, that proper set-up and management will be even more important for helping to ensure success with this type of system!
Ventilation
Once you have your tub picked out, it’s time to focus on ventilation. Off the shelf, most plastic tubs offer little to none - so it’s going to be important to install our own ventilation system.
Don’t worry, this is a lot less complicated than it sounds! ;-) It can be as simple as drilling a lot of air holes in the lid and sides - or, you can get a bit more “fancy” and install some form of screened or louvered vents.
We’ll stick with drill holes to keep things simple for our examples.
We recommend using a ¼” bit for your holes. The exact number you need isn’t set in stone but generally, the more the better (as touched on, a common issue with plastic worm bins is insufficient air flow, not “too much” air flow). Aiming for at least 20 in your lid and at least 10 on each side is a good starting place - and you can always add more later, if need be. Most of the holes in the sides can be up close to the lid, but adding some in the lower half of each side can help to boost your air flow even more.
Set-Up

With a basic, no-drain tub like this, it’s important to set it up in such a way that will support good air flow and provide you with good moisture-holding properties.
We recommend aiming for a 70:30 ratio of safe habitat materials vs food, but don’t hesitate to bump that up to 80:20. This doesn’t need to be an exact science, and it should be easily accomplished using our “3 Zone” approach:
- False Bottom (⅛ volume)
- Worm Zone (¾ volume)
- Cover bedding (⅛ volume)
False Bottom - This is where you can add a lot of bulky, absorbent bedding, such as hand-ripped or shredded corrugated cardboard, or “scrunched” unbleached paper (we recommend avoiding office paper, especially shredded, as much as possible). This helps to support good air flow and plays a very important role in absorbing excess moisture. This material can be added dry.
Worm Zone - This is where you should add a damp mix of different bedding and other safe habitat materials, your initial food layer(s), and your composting worms. We’ll come back to this one in a minute.
Cover Bedding Layer - As the name implies, this is a thick layer of bedding over top of the main worm composting zone. It helps to retain moisture, and provides a good cover for your food deposits, helping to reduce the chance of odours and pest invasion. Apart from loose bedding materials (e.g. shredded cardboard, hemp tow, straw), adding some form of worm blanket can provide extra protection and habitat enhancement.
Worm Composting Zone - in More Detail
To help establish a quality worm habitat, we recommend using a variety of different bedding and living materials (LMs). Shredded corrugated cardboard, ripped up egg carton cardboard, rinsed coco coir, and hemp tow are great as bedding, while aged, bedded livestock manures, composts, or decomposed leaf litter (aka leaf mold) are examples of helpful LMs. There are also different amendments you may want to consider as well, such as our pH Buffer/Grit and Biochar. These are completely optional, but they can help you enhance the vermicomposting process and quality of the end product. The buffer/grit can be added at about 2 tbsp per square foot, and the BioChar at a rate of about 1 cup per sq ft (ongoing, you can add these amounts monthly).

Adding your worm zone materials in layers (moistening as you go) is ok, but we highly recommend actually mixing and moistening all your components in a separate container before adding over top of your false bottom. A bedding mix we often recommend is roughly 40% shredded cardboard, 40% rinsed coco coir, and 20% hemp tow. Add in some living materials and amendments if you have them, along with enough water to make your mix nice and damp, but without much pooling down in the bottom of your mixing bin.
NOTE:
- Don’t worry too much about creating the exact mix described - it is best to work with the bedding/living (etc) materials you have on hand (be sure to refer to our articles on: 1) Bedding, and 2) Living Materials for more guidance)
- Aim for a mix that holds moisture but also supports airflow
Once your habitat mix has been added to your system - remember, we’re aiming for about ¾ the volume of the bin - you can add a layer of starter food materials. Fast to break down wastes like fruit and/or veggie scraps, such as apple cores, banana peels, melon, cucumber or lettuce (and other leafy greens, avoid dressing though) are a great choice for your first food deposit.
The cover bedding layer is similar to the false bottom. This is where you can add dry, absorbent materials, like shredded cardboard, coco coir, hemp tow - even straw - as a final layer in the system. As touched on, combining loose bedding with some form of worm blanket (such as our hemp blanket) can further enhance the protection that this zone offers.
NOTE: If you do mix up your worm zone habitat materials separately (recommended), it is best to make more than you can use for the set-up (especially if you have living materials). The mix will continue to break down over time making it even more valuable the longer it sits. You can keep it in the same bin you mixed it in - just make sure to add a lid or lay a loose sheet of plastic down over the surface of the mix to prevent excess moisture loss. This material can be added every time you add more food to further enhance the worm habitat zone.
Adding Your Worms

If you happen to have other vermicomposting systems on the go, a very easy/effective way to stock a new bin is to simply transfer over some worm-rich material. This offers a great way to get started, since the worms will come with lots of rich, living habitat material they are already used to (along with plenty of other beneficial composting critters), and the population is given the opportunity grow more naturally, up to a level that is well-suited for the size of system you are using.
Stocking your system with bulk worms from a reliable supplier can work well too - we recommend starting a bin this size with ½ - 1 lb of Red Wiggler worms - but it will be more important to make sure the habitat is ready for them. One great way to do this is to include one or more types of living material - especially what we refer to as “primary living materials” (e.g. aged, bedded horse manure) - in your worm zone mix. With LMs in the mix you should be ok to add your worms the same day the system is set up. If you don’t have any LMs you may want to let the system age for 3-7 days before adding the worms.
Actually adding the worms can be as simple as pulling back your cover bedding layer(s) and emptying the bag (or adding the worm rich material from another system) directly over top of the worm composting zone. You can leave the lid off (in a brightly lit location) to help encourage the worms to move down into the habitat.
Moisture Management
The goal with our Basic Single-Bin System was to offer a very simple approach for setting up a worm bin. One that wouldn’t involve some of the mess and maintenance hassles you can encounter with free-draining systems. That said, it’s important to remember that no-drain systems do require a fair amount of vigilance and care.
All that moisture needs to go somewhere, right? ;-)
We’ve talked about the importance of good air flow. The number of air holes we recommended will help your system release excess moisture, but if conditions still seem to be overly wet, don’t hesitate to drill even more.

Bedding is also a very valuable moisture-management ally, and we encourage you to add dry, absorbent bedding (e.g. shredded cardboard) regularly. You can place it up top in your cover layer, but also down in the very bottom when you notice conditions start to get a bit swampy.
Lastly, it’s also important to note that you are more than welcome to add drainage holes to your Basic Bin, if that’s your preference! Just make sure you line the bottom of the tub with moistened newsprint or kraft paper (to avoid having the worms crawl out the bottom early on), and set the system in a larger tray or tub to catch your drainage liquid (leachate). The bin should be propped up with bricks or some other separator, so the drainage holes don’t end up submerged in liquid.
Double-Bin Flow-Through System
Our double-bin system design offers a somewhat more advanced way to enjoy the vermicomposting process. Unlike the basic approach just outlined, in this case you will have both drainage and “continuous flow-through” (CFT - also referred to as “flow-through” or “continuous flow”) castings-separation benefits.
You’ll start with the first bin (in much the same way as described for our basic bin system), continuing to use that as your main worm bin, until much of the habitat and food has been processed, and the overall level of compost in the bin is getting up towards the top. Next, you will place a second bin (with ¼” holes drilled in the bottom) directly over top of the lidless lower bin, and then start up this second bin with new bedding and food (etc). This will encourage the worms to migrate upwards and, after a period of time, you can remove the bottom bin (the top bin becomes the new “bottom bin”) and harvest the castings - which should be relatively free of worms - for your garden!
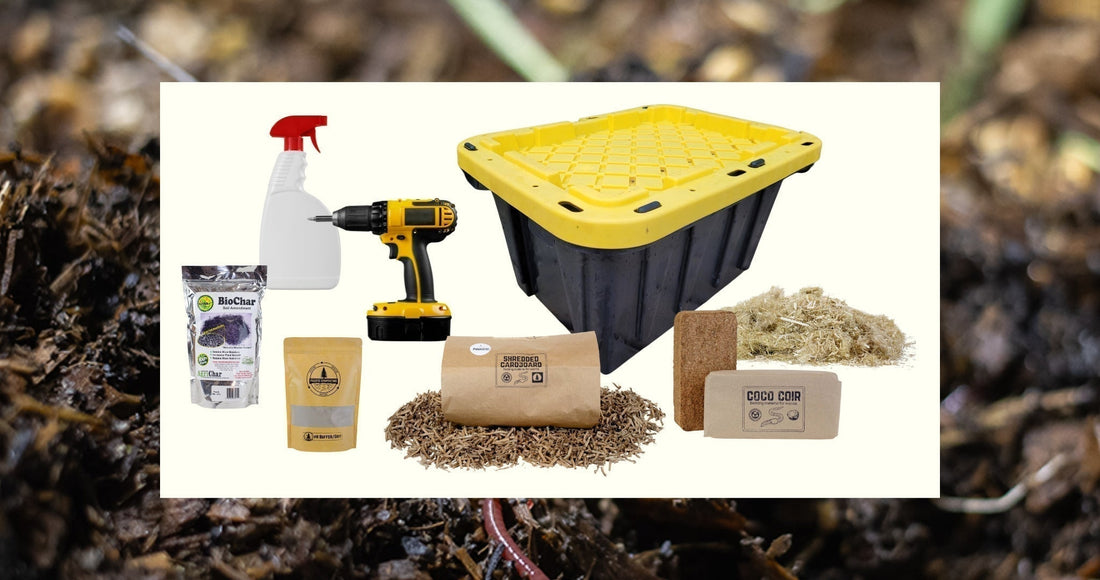
Materials:
- Two 18 gallon plastic storage containers with 2 lids (not transparent)
- Drill with ¼” bit
- Spray bottle for misting the habitat
- Habitat Materials:
- bedding materials like shredded cardboard, ripped up egg cartons, leaf litter, coco coir, straw, hay, hemp tow, etc...;
- ideally, some form of living material, and
- amendments such as fine sand, rock dust, oyster shell flour, biochar, etc...
NOTE: We recommend a mix of at least 2-3 bedding/living materials, ideally using what you have good access to. Amendments can enhance the habitat (and end product) but are not critical for getting started.
- Food: initially a small amount of easy-to-break-down fruit/veggie scraps such as chopped up apple cores, banana peels, melon, cucumber or lettuce (and other leafy greens, avoid dressing though) is all you need to get things going.
- ½ to 1 lb of red wiggler worms or several litres of worm-rich material from an existing system.

Instructions on Building & Filling the Worm Bins:
Please keep in mind that the materials being used can vary, so feel free to use what you have readily available.
- Flip the bins upside down. With the use of the drill and ¼” drill bit, make around 20 drainage holes, equally spaced. These holes will both provide drainage and allow the worms to crawl from the lower bin to the second bin when you are ready to harvest the castings.
NOTE: To help ensure the worms don’t get injured during migration, make sure all extra bits of plastic and sharp edges have been removed from the holes after drilling.

- Drill ¼” ventilation holes spaced every 1-2” apart on each side of the bin, 2” or so from the top of the bin.

- Drill 20-30 (¼”) ventilation holes in one lid. This will be the lid for the system (the other lid can be used as a temporary drain tray, so it’s best not to drill holes in it).
- It is time to prepare the habitat for the worms. Start by adding 1 or 2 layers of newsprint or a single sheet of brown kraft paper down over the bottom of the bin, and dampen with a spray bottle. This will help to avoid having any worms roaming out early on (you won’t do this when you add your upper bin since it would impede worm migration).
Follow the same false bottom and worm zone instructions provided for the basic system (above). Again, you can add worm zone materials in layers, but our recommendation is to mix and moisten your materials in a separate container (and keep any extra you end up with for future use).
- Add your cover bedding over top of your worm zone. Again, this should occupy about ⅛ the volume of your bin and consist of loose, bulky bedding materials like shredded cardboard, hemp tow, or straw. Some type of worm blanket can be added underneath the loose bedding for added protection and habitat improvement, but is not mandatory.
- Pull these cover bedding elements back and add a small quantity of easy to break down food waste, such as the ones mentioned earlier, to provide the worms with a starter supply of food that will get quickly colonized by microbes.
- Snap on your lid (one with the holes), and place the other one (without holes) upside down below the bin to serve as a temporary drainage catch tray.
NOTE: Even with drainage, it will be important to avoid letting your system get too wet, since this can impede the vermicomposting process and make a mess underneath your bin. We highly recommend switching to a deeper tray (for drainage) as soon as possible. This will greatly reduce the chance of making a mess on your floor. Something like a plastic mortar mixing tray can work very well for this. It is best to prop the bottom of the worm bin up on blocks of wood or bricks so the bin (and false bottom) don’t end up submerged in leachate.
Once the bin has been set up, we recommend allowing the habit to age for 3-7 days prior to introducing the worms. This waiting period can be shortened or completely eliminated when including lots of living material and/or stocking the system with worm-rich material from another system.
Keep your new double-bin system either indoors - in a space with proper ventilation - or outside in the shade (at times of year when temperatures are favourable).
Leachate Management
The liquid that drains from the bottom of your bin should not be treated the same as a quality castings/compost tea. It can contain phytotoxic (plant harming) compounds, even pathogens in some cases, so it should be treated with caution. If diluted at least 5:1 with water it should be fine to use on outdoor ornamentals or added to a backyard composting system.
NOTE: With really mature systems, leachate can be closer to actual “teas”, but some caution is still warranted.
Feeding The Worms (Applies to Basic System as Well):
Once the worms have been introduced to their new environment, it is important to wait 2-3 days before introducing more food, and then to start slowly. If possible, it is best to chop up your wastes into small pieces, since this greatly increases the surface area for microbial colonization (thus speeding up the breakdown process). Once worms begin to multiply, more food can be added, but always focus more on the feeding activity of the worms, than on adding any specific amount of scraps they are “supposed to” be consuming each week.
 It is important to always keep your food buried, to reduce the chance of fruit fly (and other pest) outbreaks and excessive mold growth. A simple, but effective feeding strategy involves adding thin layers of food underneath your thick cover bedding layer (and worm blanket if you have one), and then simply adding more once the worms seem to have consumed most of it.
There are a lot of factors that will affect how much food your system will be able to handle (e.g. temperatures, types of wastes, size of worm population, air flow etc), but most home systems should be able to handle moderate feedings 1-2 times per week. The good news is there is absolutely no problem feeding less often than this, but adding too much food can lead to a wide range of problems.
Also keep in mind, the worms consume the bedding over time as well (this is an especially important food source in systems that don’t receive food very often), so it is always important to keep replenishing it!
Fine sand, rock dusts and broken up eggshells help in worm digestion, so it can be helpful to include small amounts of these on a periodic basis as well.
For more information about feeding your worms, be sure to check out this blog post: How to feed your worms to get the best results from your worm bin
Enhanced Feeding with Worm Boost
Apart from the amendments discussed earlier, another optional supplement is PC Worm Boost. We designed this mix to not only provide the worms with additional nutrition, but also to help balance pH and enhance the habitat with valuable “browns”.
Worm Boost can be sprinkled in during the set-up process and any time you feed the system.
You can learn more about this supplement HERE.
Adding a Second Bin & Harvesting Vermicast
When the first bin is quite full, and there aren’t recognizable food scraps left, it is time to add your second bin. Start by removing any leftover bedding and other unprocessed materials, along with any concentrations of worms you see near the surface. These materials and worms can be set aside in another container for the time being.
Next, you should add some worm zone mix (either more of your original mix or from a new batch if you’ve used it all up) and some food in the bottom of the second bin. Remember, we won’t line the bottom with a layer of moistened paper or newsprint since we need worms to migrate up into this bin.
At this point we can add any leftover bedding and worms we collected from the surface of the first bin and snap on our lid.
This second bin should then be nested gently in the first bin so that the contents of the first bin come into contact with the bottom of the second bin. Over time, you will continue to add food and habitat deposits to the upper bin in much the same way as you did with the first bin. This should result in most of the worms from the original bin migrating up, leaving behind mostly vermicompost. This process may take 1-2 months.
Speeding Up The Harvesting Process
If you wish to separate the worms from the vermicast as quickly as possible, we recommend a much more active migration/light harvesting approach. Once you have the second bin ready to go with the new habitat mix, food, and materials/worms moved from the first bin, nest the first bin in the second bin (so, literally the opposite of the longer term method). At this point you will shine a bright light over top of the open bin and gradually start scraping away layers of compost from the surface. The light and vibrations will drive worms downwards, eventually leading them into the new bin. You will then have an empty bin (which can be removed and use for next migration), some nice finished compost, and a new bin ready to go with worms!
To learn more about light/migration harvesting be sure to check out “How to Separate Worms from Their Castings”
Once your new bin is full/mature, you will simply repeat the process over again!
Final Thoughts
Plastic DIY worm bins can be an easy, inexpensive, and effective way to get a vermicomposting system up and running, but they do require proper set-up and maintenance for best results!
Whether you decide to go with a basic single bin or try the two-bin stacking system, by following the guidelines shared above (and asking any additional questions you have) you should end up pleased with the results!
Download the Easy DIY Worm Bin instructions!
Additional Resources You May Find Helpful
- Worm Care Guide (Free When You Sign Up For Composters Club Newsletter)
- What is Living Material?
- How to feed your worms to get the best results from your worm bin
- Bedding - The Most Important Material in Your Worm Bin?
- DIY In-Ground Worm Composter
- Common Questions About Harvesting Worm Castings
- How to Separate Worms from Their Castings
-
Smelly Worm Bins - Possible Causes & Effective Solutions